At the beginning of my work this week, I was really struggling with the idea of a locus and how to create a drawing, either by hand or on Geogebra. There are of course some simple loci that I am very familiar with: a circle, a perpendicular bisector of two points, etc. However, I was struggling to apply this concept to more complicated situations that involved conics. I also felt very limited in my explorations because my GGB knowledge is quite minimal.
After finding this youtube video, I was at least able to reconstruct one example of a locus (see below). Without any verbal instructions as to how to create the drawing, I looked at the video of the GGB sketch and observed how certain components of the figure changed as point A slid along the x-axis. Here were my steps in reconstructing the drawing:
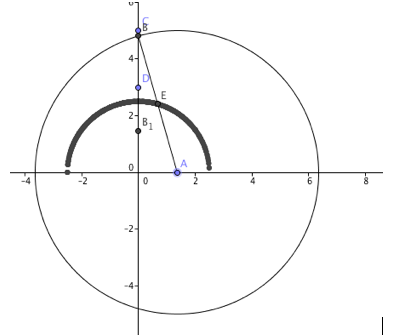
By sliding point A along the x-axis, the locus was traced by point E in the form of a semicircle. This is intuitive because the distance AE has a fixed length of 2.5. As point A is moved, point B has to move as well to maintain the correct radius and remain on the y-axis. The equation that shows how A and B are related is as follows: (A-0)^2 + (B-0)^2 = 5^2 = 25. Also, since AB is a radius, A must maintain a domain of -5 < x < 5.
After finding this youtube video, I was at least able to reconstruct one example of a locus (see below). Without any verbal instructions as to how to create the drawing, I looked at the video of the GGB sketch and observed how certain components of the figure changed as point A slid along the x-axis. Here were my steps in reconstructing the drawing:
- I made a new point, A, on the x-axis.
- Then I defined a circle with center A of radius 5.
- Next, I made point B - the intersection of the circle and the y-axis.
- My next step was to create the midpoint, E, of radius AB.
- Lastly, I turned on the trace feature for midpoint E.
By sliding point A along the x-axis, the locus was traced by point E in the form of a semicircle. This is intuitive because the distance AE has a fixed length of 2.5. As point A is moved, point B has to move as well to maintain the correct radius and remain on the y-axis. The equation that shows how A and B are related is as follows: (A-0)^2 + (B-0)^2 = 5^2 = 25. Also, since AB is a radius, A must maintain a domain of -5 < x < 5.
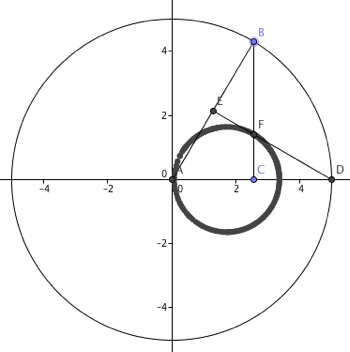
After gaining a little confidence, I used a picture from this website to create another GGB locus drawing.
Turning the trace feature on for point F and dragging point B all the way around the circle, I found that the locus turned out to be a smaller circle inside the larger one.
- This time, I started with a circle of fixed radius 5 centered at the origin.
- I then created point B on the circle and point C on the x-axis.
- To follow were segments AB and BC.
- Then I created point D, the intersection of the circle and the x-axis, which occurred at (5, 0).
- Point E is the midpoint of AB.
- Next I created segment DE.
- Point F is the intersection of BC and DE.
Turning the trace feature on for point F and dragging point B all the way around the circle, I found that the locus turned out to be a smaller circle inside the larger one.
Here is another sketch from the same website that I was attempting in Geogebra (without success):
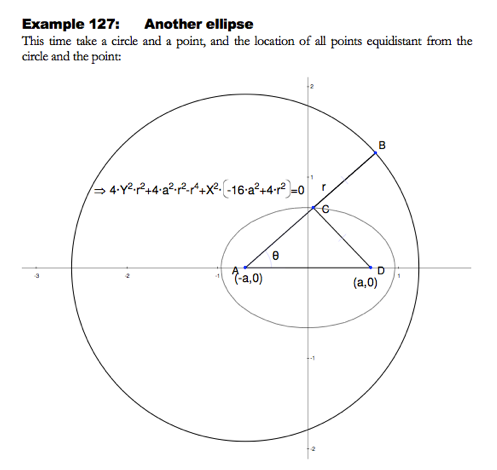
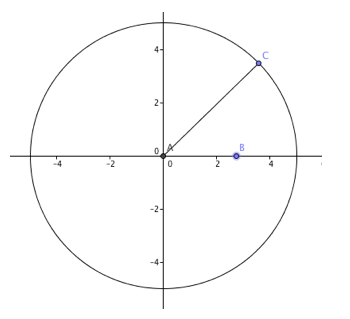
For this sketch, I felt I needed to use the locus tool so that I could trace the set up points equidistant from the circle and point D. After a bit of experimenting, I still couldn’t get it to work. This is as far as I got:
All in all, I am feeling much more confident with loci. After making a couple of sketches, I am more open to experimenting. Finding the shapes that the set of points in a locus produce is quite fascinating! I would enjoy studying this at greater depth in the future.
Prof. Golden: I would appreciate some feedback regarding how to use the locus tool on GGB. I know we worked with this some last week in class, but I am not able to reproduce it on my own. Thank you!
Prof. Golden: I would appreciate some feedback regarding how to use the locus tool on GGB. I know we worked with this some last week in class, but I am not able to reproduce it on my own. Thank you!
 RSS Feed