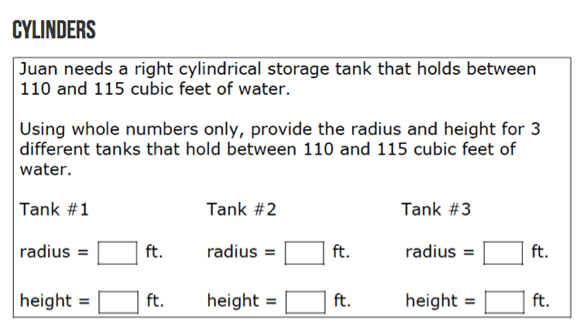
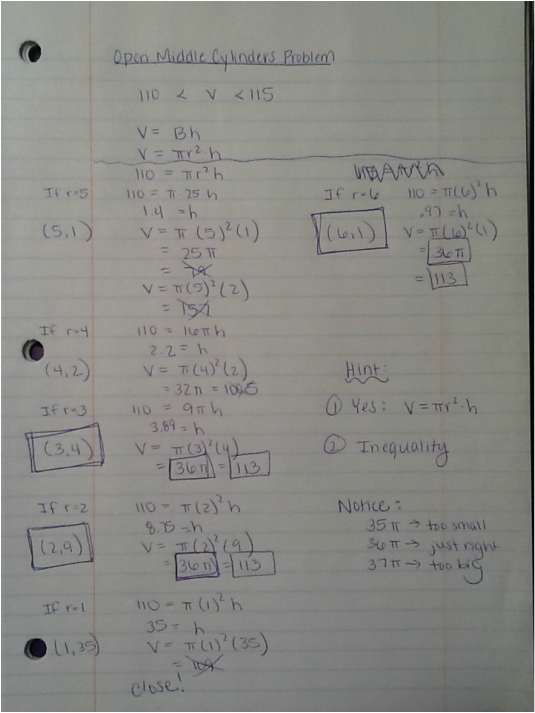
My solution to the above problem is shown below. By the time I was wrapping up my solution, I realized that a radius and height had to be found such that the volume is equal to 36*pi. This is because 35*pi is too small and 37*pi is too big. Of course!!
I think my kids would take a long time to solve such a problem. Many students would start by picking an random radius and height to calculate the volume of the cylinder. After that, I hope they would realize that it would be smart to only change one of the variables at a time (radius or height) in order to get within the desired range. However, I think some of my lower end students would lack that perseverance and would change both at the same time in the hopes that they could find a solution more quickly. As a result, they might become frustrated and give up before finding an answer. This is one of the Common Core mathematical practices that many of my students need to improve upon.
My higher end students would probably realize that having a smaller radius is more likely to result in a solution. This is because the radius gets squared in the formula; therefore, increasing the radius will vastly increase the volume. A couple of them might also realize (even a little quicker than me) that 36*pi is a solution and will try to find values of r and h that will lead to 36*pi in the formula. Another idea might stem off of the second hint regarding the inequality concept. This would be to pick a radius to keep fixed (as I did), but to solve it twice - once with the volume set to 110 and once with the volume set to 115. If the range of heights included a whole number, they will have found a solution! (I simply used 110 and figured it would get me in the right ball park. If I felt I had a viable solution, I tested it to see if it really worked.)
In summary, I think that my students might approach this problem in several ways, including approaches that I have not even thought of. While several methods would be valid, some are more efficient than others. No matter how a student chooses to solve the problem, it would provide me with insight to their current understanding of the concepts as well as their problem-solving abilities. I will definitely use this next year when I teach my surface area and volume unit, and will encourage an “open middle” as each student navigates from start to finish.
Task: Examine a topic that causes students to respond with low self-expectations.
Topic: Geometric Proof
Many of my students really struggle with the process of proof. In their mathematical experience, they have rarely (if ever) been given an answer and been asked to work “backwards” in order to figure out why it must be correct. This alternate way of thinking is overwhelming and challenging to many students, especially at first. Unless they are reproducing a proof that they have seen many times, they struggle to make those conceptual steps on their own. Lately I have been hearing of some ways to make proof more meaningful for students. Here is a collection of them, ranging to fun/game-like warm-ups to rigorous and relevant learning experiences.
- Word game: start with a x letter word. Changing only one letter at a time, end with a specific x letter word. Each time you change a letter, you must have a real x letter word in order to proceed. (Ex: CAT - BAT - BAG - BOG - DOG). Many comparisons can be made between the idea of proof and this simple word game. I think it would be a fun warm-up before proofs are introduced. (Source: http://mathforum.org/sanders/exploringandwritinggeometry/proof.htm)
- The Letter Game: I used this worksheet after Professor Golden shared it with our MTH 649 class this past fall. Some kids really went with it. It was a great way to see for which kids logic came naturally. Some kids really struggled with the worksheet, though, and I will spend more time going over examples in class next year. This is still a fun, logic puzzle kind of activity that really gets students familiar with the format of two-column proofs. (Source: Mathematics Teacher)
- Another great lead-in activity is one that I saw at the Adventures in Mathematics session at the Math-In-Action conference a few weeks ago. In this, students practice putting frames of a comic in order. They should also notice that sometimes there are frames that could be put in reverse order and the comic would still make sense - also true in proof writing. (Source: Adventures in Mathematics)
- Battle Deck: In this method, students will make flashcards of theorems and definitions throughout the unit. This is their “weapon” when it comes to proofs. Though they wouldn’t be able to use it on a quiz or test, it allows students to familiarize themselves with the theorems/definitions as well as become comfortable with the process of proof. (Source: http://www.ehow.com/info_8072211_activities-geometry-proofs.html)
- Similar to the comic book activity, cutting up the conclusions and justifications for a two-column proof and having students sort/order them is a great activity. It takes some of the stress away because all of the answers are right in front of them. They just have to make sense of it! I view this as a way to provide support when students need it, and gradually taking that support away. (Source: several)
- The IXL Geometry website also has a neat way for students to practice two-column proofs. The questions are fill-in-the-blank, much like many assessment items that geometry teachers use. However, the blank has a drop down menu with a list of options. Again, this provides just enough support as students are getting used to this format. It also gives some explanation if students make the wrong selection. Great way to give students feedback without creating extra work for the teacher! (Source: http://www.ixl.com/math/geometry)
When we as teachers are aware that a topic can cause students to have low self-expectations, we must really reflect on whether or not we are providing enough support. It all goes back to the “zone of proximal development.” Students can’t be given so much that they become bored, but they also can’t be given so little that they give up. Proof is one topic that I have always seen a need for ways to provide that extra support. If I can keep my students’ confidence level high throughout the learning process, they will be successful!
When I was at the Math-In-Action Conference at GVSU a few weeks ago, I attended a session that highlighted some of the activities in the Adventures with Mathematics books published by MCTM. It was a really helpful session for obtaining some ideas of how to put “play” back into math -- even at the high school level! We looked at six games that provide a fun and challenging way to help students practice and/or review important concepts. Normally I am not one to purchase education materials given how much can be found for free via the Internet, but before the day was done I went to buy the two Adventures in Mathematics books that are aligned to the courses that I currently teach (Geometry and Algebra 1). Here’s the link if you would like to check them out: https://www.mictm.org/resources/publications/176
Here is a brief account of the six sessions that were highlighted in the Adventures with Mathematics session:
- Polynomial Race Game: This game involves spinners, dice, and a game board. Based on the spins, a polynomial is established. The dice roll shows how many spaces to move on the game board, and where you land indicates what you need to do to your polynomial (add, subtract, multiply, or divide). There is also a “free” space where you can choose which operation you would like to use. Since the goal of the game is to end with a polynomial of highest degree, students hopefully pick up the strategy that multiplying is the best choice. I like that the polynomials and operations are selected randomly. One thing I would make sure I require is that all players in the game perform all operations so that they can check each other’s work.
- Linear or Quadratic Battleship: This game is quite like the classic game of battleship. Each player picks a line or parabola (must be specified at the start of the round) to plot on their game board. Then the opponents take turns guessing certain coordinates to see if they get a hit or a miss. To win, the player must be able to write the opponent’s equation for the graph. I think students would have to have a pretty solid understanding of quadratics in order to play quadratic battleship (i.e. what must happen in the equation to make the parabola more narrow?) It would also help to tell the opponent at the beginning of the round what the axis of symmetry is. Linear battleship would be a great game for my Algebra 1B (struggling) students, as they only need to find two points to develop the equation.
- Proof Puzzle: This is a great activity for making proof writing a bit more interesting. Students are given paper cutouts of statements and justifications, and they have to put them all in the appropriate column and order. I’ve seen this activity before, but what I really liked was how it was introduced. As a warm-up, students can practice putting various frames of a comic in order. This would be a fun way of showing students why sometimes order really matters in a proof, and other times two statements can be reversed without affecting its validity.
- Taboo: In this game, there is a stack of cards with math vocabulary words. Whoever’s turn it is has to describe the word to his or her teammates without using the “taboo” words listed below it. Trust me, it was a challenge even for a bunch of math teachers! I like that is really gets at whether students understand the meaning of the terms rather than just reciting a definition.
- Logarithm Game: I’m excited to use this one, because our logarithm unit is coming up in Algebra 1! Cards have a logarithmic or exponential equation or expression using the variables a, b, and c. Three different colored dice are rolled to assign those variables a value. Students have two minutes to rewrite the equation or expression in as many equivalent forms as possible. When finished, the student that has the most unique representations wins!
- Guess My Function: For this game you need a game board with all different types of functions. One student picks a function without revealing it to the other players. Other students ask questions that enable them to start using the process of elimination to determine which is the correct function. (Examples: Is it a polynomial of degree 4?) This really requires students to have a good overall knowledge of the function families and various vocabulary terms associated with each.
As we enter the world of Common Core State Standards and Smarter Balanced Assessments, I am always excited when I find a good multi-step, challenging, performance-based activity. It is a goal of mine to get my students comfortable with this sort of process: developing a plan, using technology to conduct research, and answering somewhat involved question(s). This activity, provided by Brian Shoemaker, did not disappoint. Before using this with my students, I thought I would take a few minutes to break it down in order to anticipate what information and resources will need to be provided, as well as to anticipate some problems that could arise.
Part One:
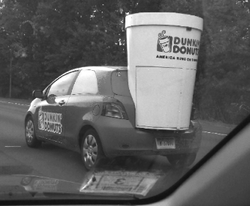
Mr. Shoemaker saw this Dunkin Donuts car driving along I-84 in Connecticut and started wondering if it could be full of coffee.
How much would that much coffee weigh? Wouldn’t the car tip over? Wow, how much would that much coffee cost?
I really like the problem posed, as it helps students to think about whether or not certain scenarios are realistic that they see in the media and in their everyday life. While it is not something that students need to know, I think it is something that many would take an interest in.
Part Two:
Find out if this would even be possible.
- You’ll need to estimate the volume of the cup and then find out the weight of the coffee that would fill it.
- Assume that coffee has the same weight as water.
- You should come up with dimensions of the cup based on its relationship to the car. The car is probably a Mazda 2. You can get all of the vehicle information online.
- You’ll need to find the cargo limit for the car.
I think my students’ initial reaction to this problem will be one of surprise. They are not accustomed to doing research for a math problem, and I think they will worry about whether or not they are using the “correct” website or the "correct" information. I will need to emphasize that two groups can have a correct solution, even if their answers are not exactly the same. The importance will be in documenting their sources.
In this set up instructions, I would probably move bullet point #3 to the beginning. This will allow students to figure out the volume of the cup and the weight of the coffee for the life-size cup, rather than have to perform yet another conversion later on.
Another way that I would need to support my students is to help them calculate the measurements of the cup based on the specs of the Mazda 2 and the picture provided. If measurements were labeled on the picture, I don’t think students would have a problem. In their usual math problems, they are so used to being provided with all the measurements necessary for their calculations. Again I would have to assure them that a minute measurement error will not cause them to get the problem wrong.
I am a little concerned with the implication of the last bullet point. By finding the cargo limit of the car, does not not necessarily answer the question of whether or not the car would tip over. The weight could be under the cargo limit, but the imbalance of that weight on the back of the car could be enough to tip it. To address this, I would do one of two things: 1) I would rephrase the question in the introduction from “Wouldn’t the car tip over?” to “Is the weight of the coffee under the cargo limit?” or 2) Add a question asking students to decide if a weight under the cargo limit is sufficient to conclude that the car would not tip over.
Part Three:
Present your guess. You must clearly show how you found the volume of the cup, the conversion to either kg or pounds, and then your guess about if the car could carry it. You should draw on your own diagram showing how you came up with your measurements.
I think the most crucial way for me to set my students up to be successful would be to model for them what a solution or partial solution would look like, even if for another problem. They need to understand that just because it makes sense to them, does not mean it will make sense to their reader (or grader!).
Part Four:
If it is possible, how much would the coffee cost? You’ll need to explain this also. Is the cost of coffee proportional to the amount that you buy?
I’m not sure I understand what this last question is asking (if the cost of coffee is proportional to the amount that that you buy). My best interpretation is that this is referring to costs of a small, medium, and large coffee. This would be a great question, as students will likely discover that buying a bigger size is often a better deal. I just think this needs to be worded a little more explicitly.
Overall, I am very excited about using this in my class. I love that it pulls together multiple concepts (volume, unit conversions, proportions/ratios, etc), just as SBAC assessment items promise to do. It also has shown me that writing my own performance tasks in the future would be a very doable thing. Thanks to Mr. Shoemaker for sharing!
Question: Does Gradual Release apply to your classroom? What do you do to move students along the spectrum?
Answer: Gradual release absolutely applies to my classroom. I see a drastic need for it with my freshman Geometry students as well as my sophomore Algebra 1 (B-track) students. In fact, I feel that GRR is by far one of my most important jobs as a teacher. At the end of the day (or school year), it is my hope that I have empowered my students to be self-sufficient, motivated learners.
My Geometry students start out the year overwhelmed with the jump from junior high to high school. Here are just some of the challenges that they face:- High school math courses are faster paced.
- Overall, the workload is significantly greater than in junior high.
- Geometry is quite different than the math they are used to (i.e. 8th Grade Algebra).
- The A and B track students are mixed together for this one year, so some B track students have trouble acclimating.
- This is the first time they are really seeing the challenging CCSS/SBAC-type problems.
My Algebra 1B students are also confronted with challenges:
- The CCSS/SBAC problems require students to have a deeper understanding of the content -- memorizing procedures like many of them have become accustomed to is often not enough.
- In general, they are not confident in their math abilities. They often do not believe they are capable of being successful on their own.
In the beginning of the year, I do a lot of direct instruction, and we usually attack difficult problems together. I do my best to model my thinking/problem-solving process and to incorporate as many student-driven ideas as possible. As I feel students are becoming a bit more comfortable, I start to ease away from whole class problem-solving and encourage small group and partner work. This really forces the students to generate their own ideas, while still having the security of not working alone. My goal by the end of the year is to have students comfortable at least attempting these difficult problems independently. It is critical that throughout the year a culture of safe risk-taking is developed. I always tell my students it’s okay to get a problem wrong, but it’s not okay not to try.
A friend and colleague of mine introduced me to the following phrases that help to ensure one is following the Gradual Release of Responsibility (GRR):
I do, you watch.
I do, you help.
You do, I help.
You do, I watch.
Hello MTH 629 Classmates! This is my first year teaching at Jenison Public Schools. I have moved around a quite a bit for someone that has only been teaching for five years. My first year, I was teaching 8th grade math (Pre-Algebra, Algebra 1) at Mason County Central Middle School in Scottville, MI. Then I moved back to my hometown to teach math at Hamilton High School (Algebra 1, Geometry, Algebra 2). Now I am teaching at Jenison and hopefully am here to stay! In the mornings I teach Geometry A and Algebra 1B at the high school. I spend the rest of my day teaching Earth Science at the junior high. Any chance one of you might be able to collaborate with me for middle school science??! ;)
There are few new aspects to my job at Jenison that I still getting used to. Jenison is a very large school, and the math department is quite large -- 13 people! It has been so nice having that many people working as a team and sharing resources. I really feel like we can divide and conquer. Additionally, JPS is kind enough to provide us with substitutes a couple of times a year if we need to work on curriculum. With how hectic everyone's schedule is with coaching, kids, etc., this is extremely beneficial.
I have also been getting used to Jenison's different math tracks: A = upper-level students, B = struggling students, C = low-level/special ed students. As with any system, tracking has its pros and cons. I like that in the A-track classes, teaches are more able to challenge the high-end students without worrying about leaving anyone behind. I like that struggling students are more likely to participate and less likely to feel embarrassed. However, in my B track class I think that without the high flyer students there to set the bar, many of them develop ever more of a sense of complacency or even apathy. The majority of them seem to have a fixed mindset. It is a frustrating to know how successful they could be if they really applied themselves. All in all, I think I like the tracking, as it best allows us to meet students where they are at.
As I look back at my time in MTH 641 (Modern Geometry) this past semester, a common theme has surfaced regarding how I view math education (geometry, in particular)...
For many years I was a student brought up in a very distinct educational culture in which mathematical concepts were presented by the teacher, practiced by the student, and then reproduced by the student on an assessment. I became accustomed to this process, and it fit my “right-brain” personality well. I loved being shown logical steps and procedures. I enjoyed working with numbers, sometimes methodically. I depended on there always being a right or wrong answer. All of this helped me to stay within my comfort zone where I knew I could be successful. Now, this is not to say that I never had my own mathematical “epiphanies,” or that my teachers never strayed from the traditional direct instruction approach. I had amazing teachers that pushed me and inspired me to become a math teacher myself. However, I was pretty close-minded as to what learning math was supposed to look like.
Over the past year and a half, I have gained some exposure to new ideas from conferences, workshops, innovative colleagues, and now my MTH 641 grad class. After all, with the switch to Common Core, it is not surprising that I would need to shift some of my instructional practices. Here are my top eight discoveries (or rediscoveries) in no particular order:
- Sometimes it is more meaningful for students to discover results through exploration than to be shown the same result via direct instruction.
- Teachers must be intentional about helping students to take risks. (The greatest mathematicians rarely achieved their goal on the first try!)
- Having students explain their thinking is a valuable part of the learning process.
- Students must become more comfortable with multi-step problems.
- Problem-solving and application should be incorporated on a regular basis.
- Technology (many forms) is a valuable tool that should be used regularly to enhance student learning.
- It is important to present mathematical concepts with multiple representations whenever possible.
- A good teacher wants his or her students to struggle! That’s when the most learning happens.
As you can see, this is quite a daunting list. In no way am I “there” in terms of mastering these ideas. Only, I now feel that I am aware of them in my daily teaching life. Adjusting my methodology is something that will take time and work. It is a slow process, but a worthwhile one. Reflecting on how much I have already grown in my first five years of teaching makes me excited to for what is to come!
Tracking... it’s one of those math education buzz words. A trend. It comes, and it goes. With all the differing opinions and conflicting research, it is difficult to know whether or not tracking is a good thing. I have had experience teaching in three different school districts, all of which used a different method of tracking. Below is a brief account of each:
My first school district was quite small, and I was the only eighth grade math teacher for the general education population. I had one advanced class that learned high school Algebra 1. The rest of my classes had widely varying ability levels that quickly became apparent through the Pre-Algebra curriculum. I was very happy to have an advanced course, as those students were ready and eager to be challenged (a teacher’s dream). My other classes, though, were sometimes a struggle. I had low performing students, high performing students, and everything in between. As a first year teacher, I desperately wanted to meet the needs of all learners but felt that this was a next-to-impossible task.
After my first year of teaching, I decided to move closer to home. I also had the opportunity to teach high school math, which was (and still is) a passion of mine, in a slightly larger and more financially-stable school district. In the high school, there was one section of a team-taught class at each level: Algebra 1, Geometry, and Algebra 2. These courses were a mix of special education students and students that had a history of struggling with math. Although I never did a team-taught class, the stories I heard from my colleagues sounded more like nightmares. (Unfortunately, behavior issues often come along with lower achievement levels.) Meanwhile, I again struggled with the issue of varying needs from my students. While I was gaining confidence with differentiating, I always felt that my bright students were being held back, never really pushed. This couldn’t be the best way, could it?
This year I am continuing my career at what will hopefully be my home district for many years to come. I am still teaching high school math, as well as some junior high science. My district is quite large, and we are fortunate to have the generous support of our community. With such a large high school comes more of an opportunity for tracking. In fact, we have three levels: A track (high performers), B track (struggling learners), and C track (team-taught/special education). There are also resource room math courses. After my dilemma of trying to meet the needs of all learners, I was excited to see if this might be the answer. An interesting component, though, is that the Geometry courses at my school mix the A and B track students. The rationale is that this will give some students the chance to jump up to A track after a transition year, even if they struggled in junior high. Teaching the mixed Geometry courses along with the B track Algebra 1 course, I am surprised a bit at my findings. Although I have several “B” students in my Geometry classes, I feel that most of them are putting forth the effort necessary to keep up with their peers. A bar has been set, and most of the students are trying to reach it. However, in my B track class, many students are living up to the expectation that inevitably goes with this lower level. I see lower rates of homework completion, less seeking of help, and more behavior issues.
In conclusion, I have been unable to make any conclusions! I don’t think that there is a right or wrong way when it comes to tracking math students at the secondary level. Unfortunately, I feel that no matter which method is chosen, some students will get the “short end of the stick.” The question is, who can we justify that to be?
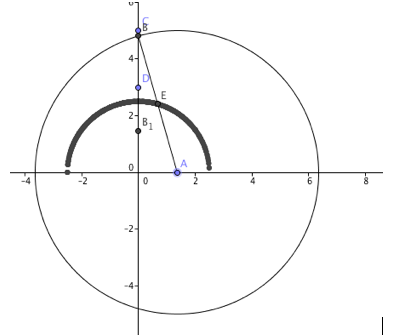
At the beginning of my work this week, I was really struggling with the idea of a locus and how to create a drawing, either by hand or on Geogebra. There are of course some simple loci that I am very familiar with: a circle, a perpendicular bisector of two points, etc. However, I was struggling to apply this concept to more complicated situations that involved conics. I also felt very limited in my explorations because my GGB knowledge is quite minimal.
After finding this youtube video, I was at least able to reconstruct one example of a locus (see below). Without any verbal instructions as to how to create the drawing, I looked at the video of the GGB sketch and observed how certain components of the figure changed as point A slid along the x-axis. Here were my steps in reconstructing the drawing:
- I made a new point, A, on the x-axis.
- Then I defined a circle with center A of radius 5.
- Next, I made point B - the intersection of the circle and the y-axis.
- My next step was to create the midpoint, E, of radius AB.
- Lastly, I turned on the trace feature for midpoint E.
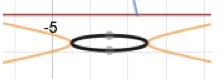
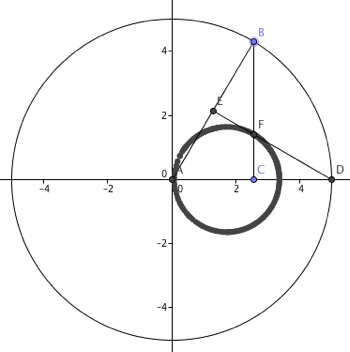
By sliding point A along the x-axis, the locus was traced by point E in the form of a semicircle. This is intuitive because the distance AE has a fixed length of 2.5. As point A is moved, point B has to move as well to maintain the correct radius and remain on the y-axis. The equation that shows how A and B are related is as follows: (A-0)^2 + (B-0)^2 = 5^2 = 25. Also, since AB is a radius, A must maintain a domain of -5 < x < 5. After gaining a little confidence, I used a picture from this website to create another GGB locus drawing.
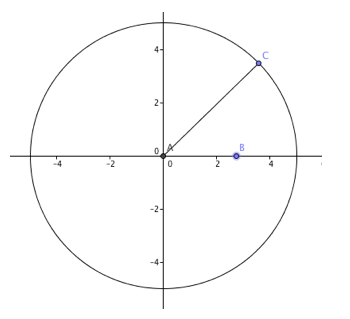
- This time, I started with a circle of fixed radius 5 centered at the origin.
- I then created point B on the circle and point C on the x-axis.
- To follow were segments AB and BC.
- Then I created point D, the intersection of the circle and the x-axis, which occurred at (5, 0).
- Point E is the midpoint of AB.
- Next I created segment DE.
- Point F is the intersection of BC and DE.
Turning the trace feature on for point F and dragging point B all the way around the circle, I found that the locus turned out to be a smaller circle inside the larger one.
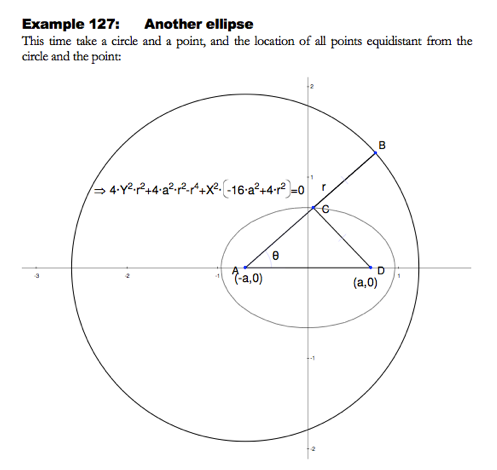
Here is another sketch from the same website that I was attempting in Geogebra (without success):
For this sketch, I felt I needed to use the locus tool so that I could trace the set up points equidistant from the circle and point D. After a bit of experimenting, I still couldn’t get it to work. This is as far as I got: All in all, I am feeling much more confident with loci. After making a couple of sketches, I am more open to experimenting. Finding the shapes that the set of points in a locus produce is quite fascinating! I would enjoy studying this at greater depth in the future.
Prof. Golden: I would appreciate some feedback regarding how to use the locus tool on GGB. I know we worked with this some last week in class, but I am not able to reproduce it on my own. Thank you!
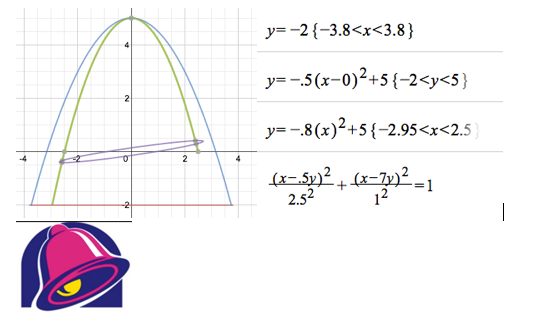
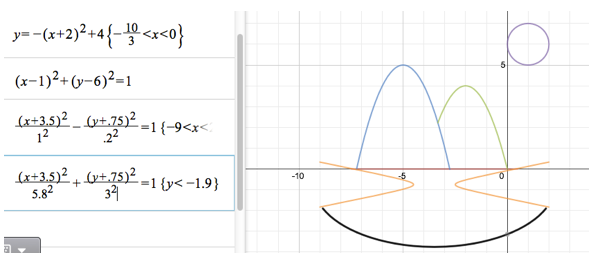
In MTH 641 this past week, we spent some time on conic sections. I have always found them to be fascinating. Only a slight change in an equation can result in a completely different graph! Not to mention how they are all cross-sections of a cone. Despite this, students sometimes struggle to find that same fascination and excitement. After reading the article “Draw It, Write It, Do It” by Leapard and Caniglia, I was inspired to make see if I could make conic sections more meaningful for my students with conic art. Below is my first attempt at making a picture out of conics sections, and the equations that I used. My first idea was to make the Taco Bell logo (also below). Here were my steps:
- Make the bottom horizontal line. This was very simple. I knew I just needed to make an equation in the form of y=k.
- Next I made the blue parabola. I knew it needed to be opening down with a y-intercept a decent distance above my horizontal line. I decided to keep it symmetric about the origin.
- Next I decided to restrict the domains of each of these functions to resemble the taco bell logo. This took a bit of experimenting in order to find that point of intersection (an advantage of using an automatic grapher rather than doing all of the algebra by hand).
- My next thought was to make another parabola. Since I didn’t know how to make a parabola with a “tilt,” I decided to simulate a tilt by restricting the right endpoint of the domain more than the left.
- My next idea was to create an ellipse, which I experimented with to get it centered and of the correct width. I knew I need to find way to actually tilt my ellipse to create an accurate representation. With a little research, I found that having a sum or difference of x’s and y’s in the numerator of the ellipse formula could create such an effect. After a bit of experimenting and not being able to shift my ellipse up or down, I decided a “non-tilted” picture might be a better place to start.
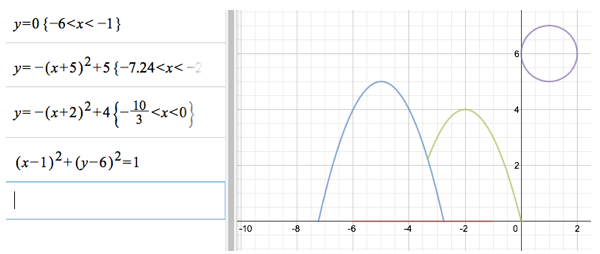
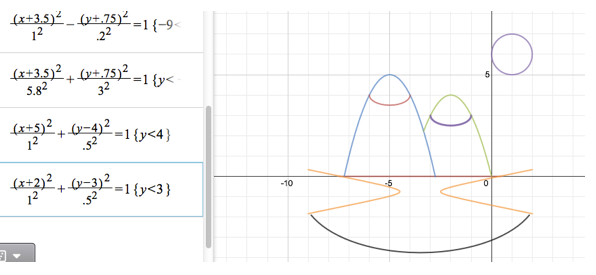
This time, I decided to draw my own picture for inspiration:
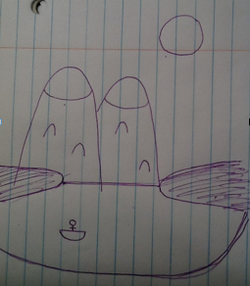
My strategy this time around was to make my equations as easy to manage as possible. Step 1: Horizontal line (water line); Step 2: Parabolas (mountains); Step 3: Circle (sun). Using the vertex form of the equations allowed me to not have to perform a lot of trial and error. Also, I used my graphing calculator to find the zeros of the parabolas, as well as their intersecting point. Here’s my start:
 My next challenge was to create the hyperbola (tree line on both sides of the picture) and half-ellipse (lake). First, I tried to create a hyperbola centered at (-3.5, -1). This line the parabola up correctly, but I definitely had to play with the a and b values to make it narrow enough to resemble a tree line. I also realized it needed to be shifted up, as the tree line would have needed to be centered at y=0, not y=-1. For ease, I decided to “meet in the middle” at y=-.75. This simply required my to widen the restrictions for my horizontal water line. Next was the half-ellipse. As a starting point, I decided to try an equation for the half-ellipse identical to my hyperbola, only with a “+” instead of a “-.” It was interesting to see that this resulted in an ellipse that sat right in the middle of the hyperbola (see right). This was obviously too small, but was lined up right where I wanted it!
It was a simple adjustment: increase the a and b values to increase the size of the ellipse. I knew I needed the a-value to be larger than the b-value in order for the horizontal axis to be longer than the vertical axis. Below is my result:
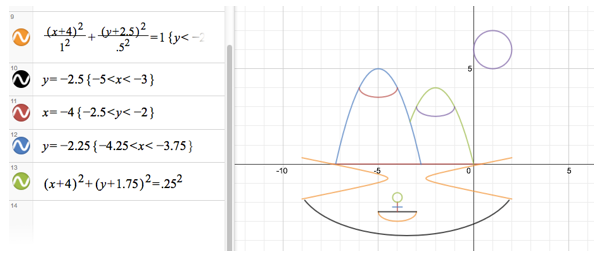
Getting closer! My next step, I decided, had to be the partial ellipses to show the snow-capped mountains. Knowing the centers of each ellipse based on the picture, this went really quickly! I was also surprised that I could use whole numbers in my range restrictions.
After looking at the rest, I decided to forget the mountain’s accent marks because I don’t think they add a lot to my picture and would have required an additional four equations. However, I was determined to get the man in the boat!
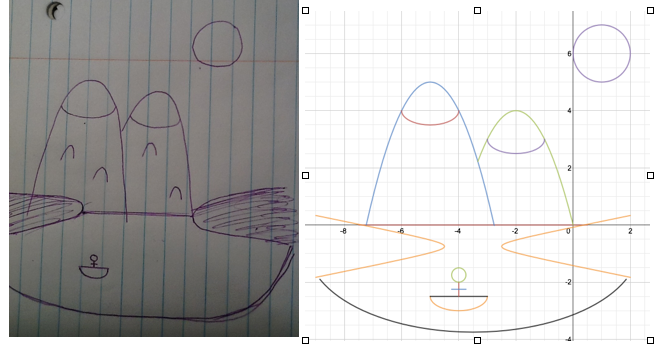
I used the same basic half-ellipse as I did for my snow capped mountains, simply changing the center. Then I made tiny horizontal and vertical lines for the man’s body, carefully selecting the restricted domain and/or range. The circle (head) also went smoothly as I was able to clearly visualize the center, as well as the size of the radius. It worked!
Overall, I was happy with how my drawing turned out. Now that I have had success creating a simple picture, my next drawing will be a bit more complex.
Final Side-by-Side Result:
|

 RSS Feed